Showing posts with label Tapas. Show all posts

Wednesday, 29 August 2012

Go-with-the-flo(s)

Today's recipe is a homage to my aunt Dorthe, also known as Flo, who runs Tebstrup Gedeosteri (click link to visit their page), where they produce a variety of wonderful organic goat cheese. Although it's actually just a simple bruschetta, I've decided to call them "Go with the Flo". Here's what you need:

Day-old bread, toasted
High quality extra virgin olive oil
Freshly blended tomatoes (with a bit of garlic for a kick)
Tebstrup Gedeost in oil (or any soft goat cheese)
A couple of fresh basil leaves, cut into fine threads (look up the cutting technique 'chiffonade')
A light sprinkle of sea salt flakes (fleur de sel)

Assemble the toasted bread with some drops of olive oil, the tomato and the cheese. Toast it a bit further. Sprinkle on the basil, some more olive oil and the sea salt.  

The tub of soft goat cheese in oil with thyme, rosemary and pink pepper corn. 

Saturday, 3 March 2012

Paella Mixta

When people think of Spanish food, one of the first thing that comes to their minds is probably the Paella. It's become synonymous with beach, sun and fiesta on the Spanish coast. However, I believe that the majority who have eaten paella in Spain has never eaten it properly prepared homemade style, but have been subjected to quickly heated, pre-cooked rice mix that comes from a frozen bag and added a couple of prawns for decoration. In fact, paella, which comes from the Valencia region in Spain, has many different varieties according to what has been added. I'm making a paella mixta, which combines seafood and chicken. Others use rabbit, seafood or vegetables only. Paella is more a way of cooking the rice than any final list of ingredients so feel free to improvise. I'm using my girlfriend's method, which she learnt from her mother.
Ingredients:
2 squids
1 glass of white wine
1/2 kg of fresh mussels, cleaned
1/2 kg of clams
1/2 kg of fresh prawns with shell and head
1 l. of fish/seafood stock
1 green pepper
1 onion
1-2 cloves of garlic
1/2 kg of chicken (upper thighs and drumsticks cut into smaller pieces, wings)
1 -2 tsp of sweet paprika
1 pinch of saffron
3/4 kg of round paella rice, preferably Arroz Bomba from Valencia 
Salt to taste
Olive oil for frying
Lemon
Green olives

 Start by cleaning the squids, remove the heads, pull out and throw away the guts and the plastic-like bone it has. Peel off the skin and cut the head off just above the tentacles. Cut the body into rings, leave the tentacles whole or half them. 
 Bring the white wine to a boil and steam the cleaned mussels in it under a lid for about 3 minutes. Shake the pot now and then so they move around. Discard any that hasn't opened. Remove the mussels, but keep the liquid.
 Steam the clams in the liquid from the mussels. According to my mother-in-law, it's best to do the clams and mussels in separate batches, in case one mussel is bad or full of sand. Then you won't spoil the liquid from the mussels. However, I am a bit lazy and in my case they were more boiled than steamed.  Again, any that hasn't opened after 3 minutes should be thrown away. Remove clams and keep the liquid. This seafood stock is the real secret to a great paella. Add the extra litre of stock. Remove the heads from the prawns and let them simmer in the stock at low heat while preparing the next step.
 First, turn your oven on at 180ยบ. Then finely chop the onion and the green pepper. Fry in a bit of olive oil until the onion is translucent. Then add the chopped or minced garlic. Add the chicken pieces and fry until brown.
 Add the prepared squid and the prawns, fry for a couple of minutes, then remove prawns. Add a the paprika. 
 Put the pinch of saffron in a tbsp of the hot seafood stock. Let it soak for a minute before adding it to the pan.
 Add the rice and let it fry for 4-5 minutes with the rest of the ingredients before adding the stock. Just remember to keep stirring it so it doesn't stick and burn. Add the simmering stock until the rice is just covered. It's important that the stock is simmering hot. The rice shouldn't be cooled down once they start cooking. Traditionally, paella is made in a flat pan over an open fire or gas burner. I have neither, so I like to finish mine off in the hot oven. That way I compensate for the deeper pan by adding heat from all directions. A little more stock may need to be added depending on the type of rice you use.
 When the rice is almost cooked through, take it out of the oven, cover it and let it finish cooking by itself for a few more minutes. The rice should be tender, not mushy nor hard at the centre. The individual grains should be loose, but it's OK if there is leftover liquid. The paella will be what is called slightly 'caldosa'.
Stir in the clams and some of the mussels and prawns. Use the rest to decorate along with some green olives (you can also choose to cook the olives with the paella). Serve with a slice of lemon on the side. Buen aprovecho.

Monday, 19 December 2011

Christmas Frikadeller

This is just a quick recipe for Frikadeller which are Danish pork meatballs. I've given them a slight Christmas twist by adding a tiny bit of cloves. I've seen people calling out for the best frikadelle recipe but as these little buggers are so heavily steeped in tradition and "how-my-mum-used-to-make-them", I'm not even gonna try claiming that. These are just simply good frikadelles, but with the best sauce in the world (oh no, I see trouble brewing)...
Ingredients:
500g Pork mince
1/2 Onion, very finely chopped or shredded
1.5 dl Cream (Or milk if you're on a diet)
1 egg
3-4 tbsp of breadcrumbs
Pinch of powdered cloves
Pinch of cayenne
Salt and pepper (Go on, don't be shy)
Butter for frying
Sauce:
1 cup of beef stock
Something sweet and fruity like a jam. I used a raspberry balsamic vinaigrette I had. About a teaspoon
1 dl of cream
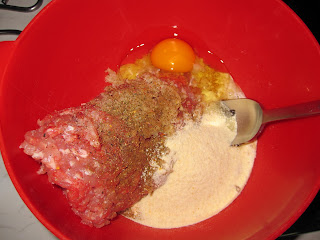
 Mix all the ingredients together in a bowl. Stir it well (use your hands if you like) until it starts sticking together like one big ball. Add a little more breadcrumbs if it's too loose. You'll have to be able to form small balls. On the other hand, don't add too much breadcrumbs as they might get dry.
 The easiest way to shape the balls is to use wet hands. If you don't like getting your hands dirty, you can use two spoons. Melt the butter over medium heat and wait for it to finish bubbling. Fry the meatballs on both sides until done. How long is that? Well, depends on how big you're making the balls and hot hot your frying pan is. I Start turning them over when I can see the mince turning greyish a bit over half way up.  
 Remove the meat balls and set aside somewhere warm. Add the beef stock to the pan to deglaze it. This basically means using all the meat bits and flavours from the frying to make this wonderful sauce. Let it reduce and thicken. Add the jam or whatever fruity stuff you're using.
Add the cream and turn off heat. The residual heat will be enough to cook the sauce through.
Serve and enjoy your holidays.

Sunday, 6 November 2011

White Truffle Butternut Squash Veloute w. Pecorino Crisp

Behind this extremely posh sounding name is a rather simple recipe which gives the butternut squash, the chubby ginger kid of the autumn season, an MTV style make-over and turn it into an unctuous and velvety superstar of a dish. I've just returned from a small vacation in Rome where I picked up a bottle of white truffle oil which seems to give this dish that extra layer I was looking for. If fancy sounding recipes make you cringe and bring out your worst kitchen phobias, this might be a first step in overcoming those fears as it's as good as fool-proof. And this way you can wow your next dinner guests with something fanciful, making them believe you've turned into some kind of super chef overnight. Truffle oil is becoming easier to find nowadays, mainly because it's mostly chemically produced and has never actually seen any truffles. Some chefs frown upon it, but for the rest of us who can't afford to buy a real white truffle, we'll have to do with this.
Ingredients:
Veloute:
1 onion
1 kg butternut squash, peeled and cubed in about 2x2 cm
1 small twig of rosemary
about 0.5-0.75 l of water
2 slices of sandwich cheese
50ml cream
about 1 small tsp of white truffle oil
Salt
Pecorino Crisps:
50g of grated Italian pecorino cheese, or parmesan
Pinch of dried oregano and thyme

Start by frying the onion at medium heat in a large pot for about 8 minutes.
Add the cubed butternut squash, the rosemary and enough water to nearly cover. The more water you add, the runnier the veloute will be. You can always add more if it gets too thick. Boil until the butternut squash is tender and falling apart. I used a pressure cooker to speed up the process.
Meanwhile, grate the pecorino cheese in small mountains on baking paper, sprinkle a bit of dried herbs on top and grill them until they become golden brown around the edges. Set aside to cool off completely and you should have small, crunchy cheese crisps.

When the butternut squash is cooked, remove the rosemary and blend the lot until smooth.
Now for the wada-woom. Add the cheese, cream and white truffle oil and stir until the cheese is completely melted. Taste for salt and add a bit more truffle oil to taste. But be careful, it's quite pungent and you only want a hint of it.
Serve with a good rustic bread, the pecorino crisp and a bit of cut chives for decoration.

Thursday, 25 August 2011

Potato Roll

Hi, today just a quick recipe - or actually, more like an idea. Basically, you just make a portion of mashed potatoes and flatten it out, add some filling and roll it up. That's it. I won't tell you how to make the mash, because I guess you can figure that out. Just make sure it's not too thin or runny. The filling I made was simply mixing canned tuna, baked red peppers, chopped green olives and a couple of boiled eggs which were all mixed together with a bit of mayo and tasted for salt and pepper. Once you have the filling and the mash, you're ready to go.

On a piece of oven paper you just pour out your cooled-off mash and then with your hands or a spatula you start flattening it until you have a rectangular shape about 1 cm thick. I'm sure your kids will find this task exciting. Get them helping. Then spread out the filling on top but make sure you don't put it all the way out to the edge or it will spill out when you roll it.

Carefully roll it by lifting up on the oven paper. It's not hard at all. Trim the ends for a prettier result or close them off with some extra mash. Place in the fridge until you need to serve it and enjoy it cold with a bit of mayo on the side or spread out in a thin layer over the roll. Enjoy

Monday, 22 August 2011

Tortillitas de Camarones - Shrimp Pancake?

This recipe is one of my girlfriend's favourites. It's a dish from the South of Spain where they excel in frying all kinds of fish and seafood. It's really nothing more than a pancake with some baby shrimp mixed into the batter. Here's what you need:

1 small onion, spring onion preferred.
1 small cup of flour ( the original recipe calls for chickpea flower, which makes the tortillita more crunchy.
1 egg
1 tbsp freshly chopped parsley
1 small pinch of saffron
Salt to taste
Pinch of cayenne
200g cooked baby shrimp
1.5dl. milk
Frying oil

I didn't have spring onion so I decided to finely chop and lightly fry a small normal onion for a few minutes, just enough to take the edge off its sharpness.
Mix the rest of the ingredients with the fried onion.
Add the baby shrimp and milk. Stir to a batter.
Heat up a frying pan, add the oil and fry the tortillitas as you would fry small pancakes. You can make one and see if you need to adjust for salt.

Leave the on a paper towel to absorb some of the excess grease. Try a bite and dream away to the south of Spain...

Tuesday, 16 August 2011

Fried Zucchini Flowers

Summer time and the zucchinis are in full bloom. I'm so lucky that my girlfriend's parents are zucchini fanatics. Not so much because I like zucchinis (which, to be honest, I find a mildly boring vegetable), but because I have access to all the zucchini flowers I can pick. Zucchinis have two types of flowers: those which have a thick stem and which will turn into zucchinis, and those with a thin stem which are the "male" flowers and are only good for pollination... almost! Because you can also eat these. It's apparently a big thing in Italy, where apart from just frying them like I did, they also stuff them with cheese and herbs. Try it for yourself:

some 12-20 zucchini flowers
1 egg
1 dl. of water
1 dl. flour
pinch of salt
pinch of cayenne
Some neutral oil for frying

Start by mixing the batter (all the ingredients apart from the flowers). Leave it to rest in the fridge while preparing the flowers.

You can either wash them and leave them to dry if you aren't sure how clean they are. I picked mine directly from their organic garden so I just brushed off any small insect I might come across. Then gently open the flowers and remove the stamen as it's quite bitter (I've read). It snaps off easily. Trim the stem back to a centimeter and break off those green leafs from the base of the flower.

Heat up a good amount of neutral oil on a non-stick frying pan. Dip the dry flowers in the batter and place them directly into the hot oil.

Fry them for a minute on one side then or until they look golden and crispy, then turn them.

Place on a paper towel to absorb the excess oil. Eat while warm and crispy.

Sunday, 7 August 2011

Rabbit's Liver Snack

I bought a rabbit recently to use in a Paella and it came with these two good-looking chunks of liver which I thought would be a shame to throw away. So I decide to make a small tapas to start the meal. Here's how:
Ingredients:
Rabbit's Liver
1 -2 tbsp Lemon Juice
Pinch of thyme
Salt, pepper
Olive oil
Baguette

First, marinate the livers in lemon juice, thyme and a pinch of salt for about 20 minutes. Then slice them.

Heat up the oil in a frying pan until it's very hot (when you start to see the first whisk of smoke), and then just fry them very fast. Add freshly chopped parsley and be generous with the black pepper. You might also want to add a little flaky sea salt. Slice the bread, place the liver on top and drizzle with the oil from the frying pan. Absolutely delicious...

Tuesday, 14 June 2011

Moroccan (inspired) Meatballs w. Fennel

I'm just back from a quick holiday in Marrakesh with a bag full of spices and a head full of inspiration from the Moroccan cuisine. It's a highly recommendable city to visit for any food lover as their cooking is something quite unique. As you probably know, most of their dishes are cooked in a tanjine, an earthenware pot with a kind of chimney lid on. But although they sold them in almost every second shop, I got tired of haggling in the end and never got round to buying one. But you can easily cook with out it. Here are some meatballs with fennel and chickpeas. I don't know if it's an original recipe, but it's delicious nonetheless and already takes me back to the food stalls in Jamaa el Fna.

Ingredients:
400g. minced beef or lamb
1 tsp. tumeric
1 tsp. harissa (or chili powder)
1 tsp. paprika
1 tsp. cumin
1 tsp. Ras el Hanout (North African Spice mix, a bit similar to Garam Masala)
Small handful of fresh parsley
2 medium sized onions
1 fennel bulb
3 carrots
1 can of precooked chickpeas
1 can of peeled tomatoes
1/2 cup of water
Olive oil
Salt and pepper to taste

Mix all the spices and add 1/3 of it to the minced meat. Add a bit of the parsley. Mix it in well (best done with the hands). Form small meatballs 3-4 cm in diameters.

Fry the meat balls in olive oil and set a side when brown all over.
Chop and fry the vegetables in the same frying pan with the oil from the meatballs. Add the rest of the spice mix and a teaspoon of salt. Fry at medium temperature until all the veggies are soft and translucent.

Then drain the chickpeas and add them to the vegetables along with the can of tomatoes (I like to blend my tomatoes first, but that's up to you). Let it simmer 15 minutes at low temperature.

Finally add the meatballs, and the fresh parsley. Keep a bit of the parsley for sprinkling on top. Heat the meatballs through and serve.

Sunday, 24 April 2011

Octopus Stew as seen on Ramsay's F-Word

I love cooking shows. Master Chef, The F Word, Kitchen Nightmares (The British version for sure), In Search of Perfection, Good Eats, Jamie Oliver, the lot. Great inspiration for the kitchen. In the recent edition of the F Word, Ramsay had local restaurants battle it out in the kitchen to become the best locale restaurant. He had divided the contestants into categories according to their cuisine. In the best Italian restaurant episode Ramsay went to Italy to catch some Octopus and ended up making a little octopus stew. From what I could see, this is how he did it.
Ingredients:
1 octopus
Splash white wine
salt, pepper
Bay leaf
1 red chilli
1 red onion
2 cloves of garlic
2 plump tomatoes
Olives
1 tbsp. Capers
Fresh Parsley
1 to 2 cups of fish stock
Olive oil

Bring a big pot of water to a boil, add plenty of salt, a bit of white wine, and 1 or 2 bay leafs. Rinse the octopus and boil it in the water 10 minutes under lid.
Meanwhile, fry the chilli, onion and garlic in a bit of olive oil at medium heat until it's soft and translucent.
Take out the octopus, remove as much of the skin as you can. Cut the tentacles in bite sizes, and use the meaty part of the head. Discard the rest.

Add the octopus to the onions, along with the chopped tomatoes, chopped olives, capers and parsley.
Add fish stock and a bit of olive oil. Let it simmer without lid 30-35 minutes until the stock is reduced and thickened.

One tasty octopus stew coming up.

Wednesday, 2 February 2011

Arriba Arepas! (Back to blogging, finally)

Hello again!!! I've finally got back on the Internet after months of only having some awful mobile connection. So it's time to start posting recipes again. We moved out of our old flat back in November and, after much renovation, we're slowly beginning to think of our new place as a home. Unfortunately, I have to admit that the kitchen is probably my least favourite part of our new flat. I still can't find things when I need them, we've got a vitro-ceramic cooker in stead of the old faithful gas stove and there's a serious lack of table space for chopping and preparing food. On the upside, I love the oven where I can finally controle the temperature beyond warm, hot and extremely hot.

Well, time to get cooking. I'll start off with a recipe for Arepas which I made ages ago. If you don't know what arepas are, they are a kind of corn bun from Venezuela and Colombia. You can fill them with anything you'd normally put in your buritos or tacos. I'm terrible sorry I can't remember the exact measures, but I think I usually go by feeling anyway. The dough should bind together without being neither too dry, nor too wet. That probably doesn't mean much, but you can always look at the bag of flour. It has the ratios.
Ingredients
Precooked corn flour (Harina P.A.N.; not the fine kind, but the one that resembles sand in texture, in a yellow bag)
Milk
Butter
Fresh sweet corn (Optional)
Chopped scalion (Optional)
Salt
Shredde cheese (Optional)
Filling according to taste

Warm up the milk untill it just stats to simmer. Add a spoonful of butter into the milk and lt it melt.
Mix the flour and the rest of the ingredients.

Pour over the milk, mix it and press it together to a ball with your hands. Leave it to rest 10 minutes. Remember the flour will absorb the liquid, so better add a bit too much than too little.

Shape the dough by hand into flat patties the size of hamburges. Wet your hands a bit to smooth ot the edges and any cracks in them.

Fry them in oil. Don't touch them straight away or they will stick to the pan. Let them form a crust.

Flip them over once they are golden.

Tap them with a bit of kitchen paper to remove any excess grease. Cut a pocket in them and fill them with chicken, cheese, lettuce, guacamole or whatever you desire.