Monday, 19 December 2011

Christmas Frikadeller

This is just a quick recipe for Frikadeller which are Danish pork meatballs. I've given them a slight Christmas twist by adding a tiny bit of cloves. I've seen people calling out for the best frikadelle recipe but as these little buggers are so heavily steeped in tradition and "how-my-mum-used-to-make-them", I'm not even gonna try claiming that. These are just simply good frikadelles, but with the best sauce in the world (oh no, I see trouble brewing)...
Ingredients:
500g Pork mince
1/2 Onion, very finely chopped or shredded
1.5 dl Cream (Or milk if you're on a diet)
1 egg
3-4 tbsp of breadcrumbs
Pinch of powdered cloves
Pinch of cayenne
Salt and pepper (Go on, don't be shy)
Butter for frying
Sauce:
1 cup of beef stock
Something sweet and fruity like a jam. I used a raspberry balsamic vinaigrette I had. About a teaspoon
1 dl of cream
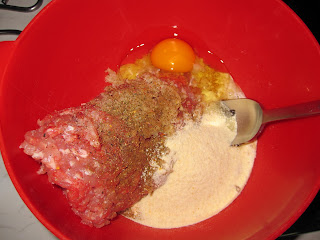
 Mix all the ingredients together in a bowl. Stir it well (use your hands if you like) until it starts sticking together like one big ball. Add a little more breadcrumbs if it's too loose. You'll have to be able to form small balls. On the other hand, don't add too much breadcrumbs as they might get dry.
 The easiest way to shape the balls is to use wet hands. If you don't like getting your hands dirty, you can use two spoons. Melt the butter over medium heat and wait for it to finish bubbling. Fry the meatballs on both sides until done. How long is that? Well, depends on how big you're making the balls and hot hot your frying pan is. I Start turning them over when I can see the mince turning greyish a bit over half way up.  
 Remove the meat balls and set aside somewhere warm. Add the beef stock to the pan to deglaze it. This basically means using all the meat bits and flavours from the frying to make this wonderful sauce. Let it reduce and thicken. Add the jam or whatever fruity stuff you're using.
Add the cream and turn off heat. The residual heat will be enough to cook the sauce through.
Serve and enjoy your holidays.
No-Name Chocolate Spread

Now, if I were a food manufacturer I could probably get in to all sorts of problems calling this a chocolate spread as it doesn't actually contain any chocolate. But it would probably be less trouble than if I called it Nutella which would clearly infringe the brand name. So I'll stick to chocolate spread and let you decide what to call it. However, I'll dare say that it's way more delicious than the one you buy in the store, and as taste is something individual they can't sue me for that. I'll let you be the judge. Is it healthier? Hey, if you're so concerned about health, don't go putting on chocolate spreads on your bread. Eat an apple. But if you want to indulge and leave the diet for January, try this out. 
Ingredients:
Equal amounts of toasted hazelnuts and butter. I used about 150g of each
2 dl of icing sugar
4 tbsp of cocoa powder (the dark intense stuff, not the sweetened)
Pinch of fine salt (if you use unsalted butter)

 Start by chopping and grinding the roasted and peeled hazelnut until you get a fine flour. It should be almost like a paste as it starts to release the oils in the nuts.
 Add the rest of the ingredients and mix until you've got a homogeneous paste. I used a food processor which really makes this so much easier to make. But you can do it by hand and feel proud of your effort afterwards. 
And that's it. Couldn't be simpler. Now you just need some toasted bread and to dig in.

Sunday, 6 November 2011

White Truffle Butternut Squash Veloute w. Pecorino Crisp

Behind this extremely posh sounding name is a rather simple recipe which gives the butternut squash, the chubby ginger kid of the autumn season, an MTV style make-over and turn it into an unctuous and velvety superstar of a dish. I've just returned from a small vacation in Rome where I picked up a bottle of white truffle oil which seems to give this dish that extra layer I was looking for. If fancy sounding recipes make you cringe and bring out your worst kitchen phobias, this might be a first step in overcoming those fears as it's as good as fool-proof. And this way you can wow your next dinner guests with something fanciful, making them believe you've turned into some kind of super chef overnight. Truffle oil is becoming easier to find nowadays, mainly because it's mostly chemically produced and has never actually seen any truffles. Some chefs frown upon it, but for the rest of us who can't afford to buy a real white truffle, we'll have to do with this.
Ingredients:
Veloute:
1 onion
1 kg butternut squash, peeled and cubed in about 2x2 cm
1 small twig of rosemary
about 0.5-0.75 l of water
2 slices of sandwich cheese
50ml cream
about 1 small tsp of white truffle oil
Salt
Pecorino Crisps:
50g of grated Italian pecorino cheese, or parmesan
Pinch of dried oregano and thyme

Start by frying the onion at medium heat in a large pot for about 8 minutes.
Add the cubed butternut squash, the rosemary and enough water to nearly cover. The more water you add, the runnier the veloute will be. You can always add more if it gets too thick. Boil until the butternut squash is tender and falling apart. I used a pressure cooker to speed up the process.
Meanwhile, grate the pecorino cheese in small mountains on baking paper, sprinkle a bit of dried herbs on top and grill them until they become golden brown around the edges. Set aside to cool off completely and you should have small, crunchy cheese crisps.

When the butternut squash is cooked, remove the rosemary and blend the lot until smooth.
Now for the wada-woom. Add the cheese, cream and white truffle oil and stir until the cheese is completely melted. Taste for salt and add a bit more truffle oil to taste. But be careful, it's quite pungent and you only want a hint of it.
Serve with a good rustic bread, the pecorino crisp and a bit of cut chives for decoration.

Wednesday, 19 October 2011

Half-fried Savoy Cabbage w. Bacon and Apple

Up until last week we've had 30 degrees and lots of sunshine in mid October. This is not really typical autumn weather and my cooking has reflected this. Still haven't made my pot of judiones beans yet which is usually happens when the weather change. This, however, is probably my first more wholesome dish after a long summer of light food and cold soups. My in-laws have a vegetable garden with some highly fertile soil and have had an abundance of fresh produce. I'm not a big cabbage eater (apart from the occasional coleslaw), but as they gave us a couple of homegrown savoy cabbage heads, I thought I'd try and cook something different with them. Here's the result, trust me, it's delicious:
You need:
1 savoy cabbage, or any other cabbage will do. Sliced.
150g bacon
1 apple for cooking (also from their garden)
1 tbsp rice vinegar (or a bit less of white wine vinegar)
1-2 tbsp crème fraîche, or just normal cream
2-3 tbsp sunflower seeds
Salt, pepper

Start by frying the cut bacon at medium temperature to release some of the fat.
Add the sliced cabbage, fry it for a couple of minutes.
Cut the apple into smaller cubes or sticks. Add to the cabbage. Fry for 5 minutes.
Add crème fraîche and salt and pepper. Heat the dish through, but don't overcook the cabbage. You still want it to have some bite to it.
Finally, taste for salt and add some sunflower seeds on top. Great autumn side dish.

Blackberry Pie

Hold on, no wait. Not the phone, the actually berry (or rather an aggregated fruit). This is from a harvest I made of wild blackberries on an outing during the summer, which I quickly paid the highest honor these berry can receive by baking them in to a pie. I think I picked some 200-300 grams but I'm not sure. If you still have blackberries on your blackberry tree/bush, don't pick them now, because according to old folktales the Devil has pissed on them after the 11th of October. The dough is my standard dough which you can see how to make on my (quite similar) blueberry pie recipe. You'll need:
Pie dough:
280g flour
1tsp salt
150g cold butter
5-5 tbsp ice cold water
Filling:
Your harvest of blackberries (let's say +/- 250g)
5 tbsp cornstarch
1/2 cup of sugar
1-2 tsp vanilla powder
Juice of 1/2 a small lemon

Here's my harvest, not too much but someone had beat me to the tree so I had to do with what was left. Put the oven at 220º.
Mix the berries with the sugar, cornstarch, vanilla and lemon. Crush about half the berries with a fork and mix it well together so you don't have any lumps of cornstarch. Set it aside while you prepare the dough. This will allow the sugars to dissolve and mix in with the juices of the berries.
Use about 2/3 of the dough for the base and prick some holes at the base of the pie and pour the filling in. Shake it a bit to make sure it's well distributed.
Roll out the remaining dough and make a "lid" for the pie. Prick some more holes in the lid.
Bake at 220º for 15 minutes, then lower the temperature to 170 and continue baking for about 20-30 minutes or until the crust is golden. Let it rest for at least half an hour before cutting into it. This will allow the starches to set and your filling won't run out. Serve warm, for example with a bit of ice cream on the side.

Thursday, 25 August 2011

Potato Roll

Hi, today just a quick recipe - or actually, more like an idea. Basically, you just make a portion of mashed potatoes and flatten it out, add some filling and roll it up. That's it. I won't tell you how to make the mash, because I guess you can figure that out. Just make sure it's not too thin or runny. The filling I made was simply mixing canned tuna, baked red peppers, chopped green olives and a couple of boiled eggs which were all mixed together with a bit of mayo and tasted for salt and pepper. Once you have the filling and the mash, you're ready to go.

On a piece of oven paper you just pour out your cooled-off mash and then with your hands or a spatula you start flattening it until you have a rectangular shape about 1 cm thick. I'm sure your kids will find this task exciting. Get them helping. Then spread out the filling on top but make sure you don't put it all the way out to the edge or it will spill out when you roll it.

Carefully roll it by lifting up on the oven paper. It's not hard at all. Trim the ends for a prettier result or close them off with some extra mash. Place in the fridge until you need to serve it and enjoy it cold with a bit of mayo on the side or spread out in a thin layer over the roll. Enjoy

Tuesday, 23 August 2011

Woodshade Organics

You can't bribe me... except with food! And that's just what my sister did. She's working for an organic confectionary in Denmark called Woodshade Organics. They produce filled chocolates, raw marzipan, soft nougat and lots of other sweets and candy related products - all 100% organic. And every now and again she sends me some samples of their products to taste. So why not share my thoughts with the readers of this blog and do a bit of shameless promotion for their amazing products. Hopefully, that way she'll keep sending me stuff (But don't think I'm only praising them for personal reasons. They have actually won several prizes for their product).

I'll start out with a few products I received some time back and which are long gone. The first was a small box of mixed filled confectionery. Each handmade piece was a treat. In fact, they were so delicious that they had disappeared before it even occurred to me to write down my opinion about them (Sister, if you read this, you'd better send me a bigger box next time so I can give you a more detailed opinion... he he).

Also, she sent me a small bag called RAW Cacao Nibs containing 75g of raw, dried cocoa beans, crushed into small bits. The first taste of the raw bean was quite strange as I expected it to taste more like chocolate. Instead it was quite bitter and earthy at first, almost like coffee beans. But then a taste of a fruity cocoa too over the more I chewed it, and left a strange desire to have some more. I'm sure it's an acquired taste, but most people I offered to try it all agreed it was quite unusual at first but then all asked me for more. I read up on it and it turns out that raw cocoa beans are very healthy and good for you, and it should be mentioned that it's also a stimulant like coffee. Just a few nibbles are enough to give you a boost. My final verdict: It's a keeper!

Here are some of the other products she sent. I haven't opened the cocoa powder on the left yet, so I can't really comment. The box on the right contains (or at least what's left of it) 'nougat', a praline mix of chocolate and hazelnuts. I'm not really a big fan of nougat, or at least until I tried this. I usually associated the nougat I had in Denmark with a inferior kind of overly sweet and fatty chocolate which was used as a cheap filler in cheap chocolate pralines. But this nougat seems to have stricken a fine balance of sweetness and the nuttiness of the hazelnuts. The almost empty box speaks for itself.

And then their marzipan. Marzipan is a big thing in Denmark. We love it and put it in pies, cakes, ice cream and the traditional Scandinavian birthday/wedding/funeral cake, Kransekage, is made of baked marzipan rings stacked on top of each other to make a tall cone. And come Christmas and the Danes just go wild in marzipan, making small eatable figures with their children of the raw marzipan. And I'm a big fan of marzipan, so my expectations were high when I received Woodshade's award-winning organic marzipan. And I wasn't disappointed. Again, top products are all about getting a very fine balance right. And I think that's what Woodshade's Raw Marcipan manages just that. It's not too sweet like some marzipan I've tried but has a very full well-rounded flavour of almonds (65%). Perhaps because they use a mixture of cane sugar and honey to sweeten the Italian almonds. The result is a less synthetic and sharp sweetness which you find in some cheaper brands, but a more complete experience which carries, but doesn't dominate, the flavour of almonds. The taste seems to be wider and lingers more pleasantly in the mouth. They have also got the consistency just right. It's soft and moist like playdough but when you bite in to it you feel the crunch from the almond flour. I can't really speak highly enough of this product. Not just because I got it for free. But this product really is worth the money you spend.
Now, just this morning I received a new product: Their licorice marzipan. I've noticed that licorice is now popping up in all kinds of products from ice cream to chocolate. Some times with great success, other times not so much. I was a bit worried that licorice marzipan would fall in the latter category. In my mind the two flavours just don't seem to mix. But now that I've tried it I might have to rethink it. Admitted, the first bit was rather confusing. When you have certain preconceptions about how some food is suppose to taste you sometimes need a bit of convincing before you see the point. And this was perhaps such a case. Cutting a small bit off, it had an almost smokey smell to it. Then you bit into it and the first impression is one of reassurance as your brain tells you that it's just normal marzipan. The texture and the first hit of sweetness is very similar to Woodshade's regular raw marzipan. But then it transforms into something quite unfamiliar. More than licorice I'd describe the second wave of taste closer to that of walnuts, perhaps with an undertone of pepper. Then finally you get the licorice coming through. It's quite a ride and hard to explain. I guess you'll just have to try for yourself. It's very good, but if I should have one tiny objection it's perhaps that I don't yet see it's application for other than just eating it raw as it is. Perhaps it's just because I'm used to marzipan being quite versatile, because there's absolutely nothing wrong in eating it just as it is.

If you want to know more about Woodshade Organics, I recommend you visit their homepage http://www.woodshade.dk/ . It's in English, Danish and German.

Monday, 22 August 2011

Tortillitas de Camarones - Shrimp Pancake?

This recipe is one of my girlfriend's favourites. It's a dish from the South of Spain where they excel in frying all kinds of fish and seafood. It's really nothing more than a pancake with some baby shrimp mixed into the batter. Here's what you need:

1 small onion, spring onion preferred.
1 small cup of flour ( the original recipe calls for chickpea flower, which makes the tortillita more crunchy.
1 egg
1 tbsp freshly chopped parsley
1 small pinch of saffron
Salt to taste
Pinch of cayenne
200g cooked baby shrimp
1.5dl. milk
Frying oil

I didn't have spring onion so I decided to finely chop and lightly fry a small normal onion for a few minutes, just enough to take the edge off its sharpness.
Mix the rest of the ingredients with the fried onion.
Add the baby shrimp and milk. Stir to a batter.
Heat up a frying pan, add the oil and fry the tortillitas as you would fry small pancakes. You can make one and see if you need to adjust for salt.

Leave the on a paper towel to absorb some of the excess grease. Try a bite and dream away to the south of Spain...

Lemonade - when wife gives you lemons...

Madrid is so damn hot these days so you're constantly looking for ways to refresh yourself... and I think that with this lemonade I've found the formula. I went and bought the best sun-ripened lemons I could find and then went home and made this refreshing lemonade. There're no tricks really. It's lemons, brown sugar and water. That's it. Well, of course there are always a few tricks, but this is really straight forward.
Ingredients:
6 sun-ripened lemons, the sweeter the better
3-6 tbsp brown sugar (muscovado for example). Really, you need to "add to taste"
Water to taste
Ice cubes when you want it really fresh

Press and roll the lemons with the palm of your hand before squeezing them. This makes the process easier.
Pour the lemon juice through a strainer into a jar or a bottle. Add the brown the sugar.

Shake well until all the sugar is dissolved.

Crush some ice and dilute the lemonade with water to taste. Ahh... refreshing!!!

Tuesday, 16 August 2011

Fried Zucchini Flowers

Summer time and the zucchinis are in full bloom. I'm so lucky that my girlfriend's parents are zucchini fanatics. Not so much because I like zucchinis (which, to be honest, I find a mildly boring vegetable), but because I have access to all the zucchini flowers I can pick. Zucchinis have two types of flowers: those which have a thick stem and which will turn into zucchinis, and those with a thin stem which are the "male" flowers and are only good for pollination... almost! Because you can also eat these. It's apparently a big thing in Italy, where apart from just frying them like I did, they also stuff them with cheese and herbs. Try it for yourself:

some 12-20 zucchini flowers
1 egg
1 dl. of water
1 dl. flour
pinch of salt
pinch of cayenne
Some neutral oil for frying

Start by mixing the batter (all the ingredients apart from the flowers). Leave it to rest in the fridge while preparing the flowers.

You can either wash them and leave them to dry if you aren't sure how clean they are. I picked mine directly from their organic garden so I just brushed off any small insect I might come across. Then gently open the flowers and remove the stamen as it's quite bitter (I've read). It snaps off easily. Trim the stem back to a centimeter and break off those green leafs from the base of the flower.

Heat up a good amount of neutral oil on a non-stick frying pan. Dip the dry flowers in the batter and place them directly into the hot oil.

Fry them for a minute on one side then or until they look golden and crispy, then turn them.

Place on a paper towel to absorb the excess oil. Eat while warm and crispy.

Sunday, 7 August 2011

Rabbit's Liver Snack

I bought a rabbit recently to use in a Paella and it came with these two good-looking chunks of liver which I thought would be a shame to throw away. So I decide to make a small tapas to start the meal. Here's how:
Ingredients:
Rabbit's Liver
1 -2 tbsp Lemon Juice
Pinch of thyme
Salt, pepper
Olive oil
Baguette

First, marinate the livers in lemon juice, thyme and a pinch of salt for about 20 minutes. Then slice them.

Heat up the oil in a frying pan until it's very hot (when you start to see the first whisk of smoke), and then just fry them very fast. Add freshly chopped parsley and be generous with the black pepper. You might also want to add a little flaky sea salt. Slice the bread, place the liver on top and drizzle with the oil from the frying pan. Absolutely delicious...

Monday, 25 July 2011

Summer filler

My aunt sent me this picture of a can of sausages they found in The Czech Republic. I'll let it speak for itself.

Link

Friday, 1 July 2011

Asian Style Wings That'll Make You Fly

Summer time - time to be outdoor, go to the park, spread out a blanket and open up that picnic basket. What better to bring than a bowl full of delicious chicken wings? The following recipe is so simple, yet takes simple wings and lift them to another level. The following recipe includes an Asian style glaze but they are equally great without the glaze. You could also whisk up a honey and mustard glaze, a barbecue sauce (see my ribs'n'slaw recipe), or mix in my fajita spice mix at the beginning.

Ingredients:
1 kilo of wings (serves 4-6 hungry people)
Chili sauce (optional)
Vegetable oil
1 cup of flour
Salt, Pepper
Asian Glaze:
100 ml Rice vinegar
100 ml sticky brown sugar
1 tbsp soy sauce
Chili sauce to taste

Start by seasoning the wings, add a good squirt of oil and chili sauce.

Put the flower in a bag, add the wings and shake it well (don't forget to check first if the bag has any holes!)
Remove the excess flour and place the wings neatly (with out touching one another) on a greased baking tray. Spray some oil on the wings. Put in a 190º oven, 30 minutes on one side, turn and give them another 10-20 minutes on the other until they are golden brown.

Meanwhile, prepare the glaze by mixing all the ingredients and bring it to a boil. You should cook it 10 minutes at low heat so the sharpness of the vinegar will disappear and the whole thing reduces a bit.
Pour the glaze over the wings in a bowl and mix it in well (careful, both the glaze and the wings are hot). Leave to soak for 10 minutes.

And there you go, mouthwatering chicken wings with an Asian touch.